Labels

December 20, 2011

free classic Tron lightcycle model

I have a Tron lightcycle fan game in progress.. well actually the project has stalled for exactly a year. I started wiping the dust off the project and try to finally finish a game. It means rewriting most of the code since it was made in Blender 2.49 and cleaning up it a bit. The only finished thing in the game is the lightcycle itself which I modeled from various references and blueprints from original Tron movie (1982).

some pictures of the project work in progress:


movie


cycle:


blend HERE
obj coming soon...

free low-poly shotgun model

This is an old low-poly shotgun model (from 2006) I made for testing purposes. It has been serving me well and I though I should share it with anyone.
Creative Commons License
This work is licensed under a Creative Commons Attribution-ShareAlike 3.0 Unported License
so basically you can do anything with it.

1314 triangles
1024x1024 diffuse texture


blend HERE
obj mesh file + texture HERE

December 19, 2011

GLSL depth of field with bokeh v2.4

here is a new update on the depth of field shader.
changes:
• again totally redone the depth of field calculation with 2 possible options:

- Physically accurate DoF simulation calculated from "focalDepth" ,"focalLength", "f-stop" and "CoC" parameters.
- Manual - artist controlled DoF simulation calculated only from "focalDepth" and individual controls for near and far blur planes.

• added "circe of confusion" (CoC) parameter in mm to accurately simulate DoF with different camera sensor or film sizes.
• optical lens vignetting factor based on f-stop value and user defined properties.
• cleaned up the code
• some optimization

Shader is HERE
Blend is HERE

controls:
Mouse+WASD - look/movement
LMB - drag the focal point object
1 - enables DoF rendering
spacebar - toggles debug view
Up/Down arrowkeys - zoom in/out (changes focal length)
Left/Right arrowkeys - changes f-stop value

December 13, 2011

SSAO shader update v1.2

changes since 1.0:
• v1.2 - added fog calculation to mask AO. Some minor fixes.
• v1.1 - replaced rings sampling with new spiral sampling method. Taken from HERE

fragment shader HERE
blend HERE

December 9, 2011

GLSL depth of field with bokeh v2.3

This is a major update for my depth of field w. bokeh shader.
I have added a python lens control file which gets focus distance from an object, adds control of "f-stop" variable, which controls "aperture" value for the shader.

list all of the new features:

• new and physically more accurate DoF, using real lens equations
• two extra input variables - focal length (in mm), aperture iris diameter (in mm)
• added a debug visualization of focus point and focal range (red line = focal point, green area = focal range)

separate python file:
• sets focus distance from an object
• added slow adaptive focusing for natural feel
• option to control aperture diameter with f-stop values (range: f/1, f/1.4, f/2, f/2.8, f/4, f/5.6, f/8, ..... f/256)
• focal length control (default range from 6mm to 600mm)

Shader is HERE
lens control file HERE (made for Blender)
Blend is HERE


debug focal plane and depth range visualization:


v2.2 was done yesterday and I just did not had the time to post it here.

December 8, 2011

BGE impossibe box

This is a remake of Portal 2: Impossible Box seen here - http://www.youtube.com/watch?v=JAvbdU5NIyw

I made it to test out my remote portal system using multiple viewports and a GLSL stenciling.


blend file HERE

November 28, 2011

basic deferred shading system in GLSL

Today I made a basic deferred renderer as an exercise in a single shader using only depth buffer and inverse modelview matrix as input.
Normals and position are calculated from depth buffer. Unfortunately normals are flat shaded using this method and the shader itself is quite slow, but maybe someone finds the parts of this shader useful.


blend:
HERE
fragment shader (code is quite messy) :
HERE

November 22, 2011

GLSL depth of field with bokeh v2.1

This is an update from the previous post on DoF bokeh shader.
The main addition is an option of pentagonal shape bokeh. The technique is hackish, but it works. Still I am looking for a more simpler way to make procedural n-gonal shapes of sampling.

The shader is made on 2006 iMac with Mobility Radeon card so it should work on any hardware supporting OpenGL

Screenshots are captured with high sample count, but the point is to show the features and capabilities of the shader.

some of the main features explained with images:

threshold & gain:
brings out highlights by "threshold" value and enhances them with "gain"
as you can see this is the main part that makes the distinct look of the bokeh blur. Without bringing out highlights, the blur looks like just a regular circular blur.


fringe:
adds chromatic aberration for the blur (small overlay image shows r,g,b color offset of the sample)


bias:
shifts the weights of the samples on the bokeh edges


pentagon:
pentagon shape of the bokeh (still needs some work)
edit: i have removed the "scale" factor, it is now automatic.


GLSL frag shader: HERE

October 26, 2011

GLSL depth of field with bokeh v2

This is my second attempt to create a depth of field shader with bokeh. the first one is here:
http://artmartinsh.blogspot.com/2010/02/glsl-lens-blur-filter-with-bokeh.html
And I am really glad that it got popular quite fast.

This one is much more flexible and I have added few new features.

• variable sample count to increase quality/performance
• option to blur depth buffer to reduce hard edges
• option to dither the samples with noise or pattern
• bokeh chromatic aberration/fringing
• bokeh bias to bring out bokeh edges
• image thresholding to bring out highlights when image is out of focus

yet to do

• add multi-shape bokeh (does anyone knows how to make procedural pentagon or hexagon?)
• bokeh vignetting at screen edges
• some minor fixes

screenshots:


fragment shader HERE

October 25, 2011

nicer SSAO

yet another screen-space ambient occlusion shader.
original technique is HERE by Arkano22.
I tuned it up a bit adding my circular texture sampling and pattern sample filtering.
Right now it is the best depth-only based SSAO I have come across.


another screenshot with noise dithering and "garea = 0.4;" instead of "garea = 0.6;" to lighten scene a bit.


scene with and without ssao:


glsl frag shader HERE

and blend file HERE

October 13, 2011

NVIDIA FXAA

Antialiasing has been an exclusive thing for the PC gamers over the gaming consoles. Well of course if you could afford a proper GPU to play recent games in FullHD at 16xQMSAA... until now.
Recently I have been quite interested in post-process antialiasing approaches. They are really useful for deferred renderers and for lower-end PCs and Consoles as the antialiasing process is done after the rendering the scene - as a post-process filter, just like a color correction, SSAO, Depth of Field and HDR filters.
I first stumbled upon something that tried to imitate antialiasing was in Crysis - they extracted the edges of the rendered image , blurred the rendered image and mixed the unblurred and blurred image with edges as a mask. Since then over the time the quality has increased so much that post-process AA techniques are comparable to real antialiasing. Here are more popular ones I found: NFAA, DLAA, SSAA, MLAA, SRAA, SMAA, GBAA, GPAA and SDAA... yeah there are a lot of techniques to choose. I personally really like Humus techniques (last 3), but unfortunately they require additional buffers which I cannot access in BGE right now. But few of these techniques does not require any additional buffers at all, some of them uses depth buffer and normal buffer to find the edges.

Today I have here another post-rocess antialiasing approach - FXAA by Timothy Lottes at NVIDIA.
"Fast Approximate Antialiasing" is a new anti-aliasing technique, based on several existing anti-aliasing techniques, including MLAA. FXAA is being used in Battlefield 3, DeusEx:HE, F.E.A.R.3 .
I really like FXAA because it requires only the rendered scene buffer as input and it is really simple to integrate in any game engine.

comparison shots by the Timothy himself from TheForceUnleashed2:
http://timothylottes.blogspot.com/2011/04/nvidia-fxaa-ii-for-console.html

screenshots from BGE:

without FXAA:


with FXAA


glsl fragment shader HERE

blend file for Blender 2.5x HERE
button 1 - disables FXAA
button 2 - anables it

GLSL Cubic Lens Distortion

Few years ago I ported HLSL Cubic Lens Distortion shader made by a really nice guy François Tarlier. I slightly modified it, but the algorithm basically is the same one used in SynthEyes.
I encourage to visit François homepage and blog for Blender, AfterFX, compositing, VFX and mathcmoving related stuff. He is a former Environment and VFX artist at Ubisoft hehe.

Here are few screenshots of the shader in action:
undistorted:

distorted w chromatic abberration and slight blurring at edges:


lens distortion & my BPCEM reflection scene:


a screenshot in my real-time snowflake growth demo with lens distortion shader applied:

more info about the snowflake project HERE

download link to snowflake demo blend (for Blender 2.5x & 2.6x):
HERE

download link to blend file for lens distortion demo (for Blender 2.5x & 2.6x):
HERE

controls: mouse&WASD - camera movement
1 - disables the filter
2 - enables the filter

glsl fragment shader:
http://dl.dropbox.com/u/11542084/lens_distortion

September 20, 2011

//status update 01

I have moved from Latvia to France. I dont have my own computer here and the appartment/survival problems are chasing me right now.
So I have stalled all of the personal projects for the moment till I get back on my feet. Till then I will be collecting and refurbishing my old work and I will be posting it here.

September 19, 2011

box projected cube environment mapping

I have been quite busy moving to another country, so nothing new this time. Oh, yeah, I added donate button, hehe.

BPCEM or box projected cube environment mapping is a cube environment mapping technique made by Bartosz Czuba http://devlog.behc.pl/. I thank him for helping me get this to work in BGE.

Regular Cube Environment Mapping is a very common technique of making fast fake reflections. It works best in outdoors, when reflecting distant skies and stuff that reaches to infinity, but looks very wrong in indoors, especially on flat surfaces, like walls and floor. It is caused by cube-map coordinates that reaches to infinity.

What BPCEM basically does, it takes the cube-map coordinates and clamps them to the size of the room. This technique only looks best in simple box shaped rooms. The original thread about BPCEM is HERE.

comparison stills (regular cube mapping vs BPCEM):
regular cubemap still looks fine on spheres, but wrong on flat surfaces.


All the difference makes these few lines of code:


vec3 bpcem (in vec3 v, vec3 eMax, vec3 eMin, vec3 ePos)
{
vec3 nrdir = normalize(v);
vec3 rbmax = (eMax - pos)/nrdir;
vec3 rbmin = (eMin - pos)/nrdir;

vec3 rbminmax;
rbminmax.x = (nrdir.x>0.0)?rbmax.x:rbmin.x;
rbminmax.y = (nrdir.y>0.0)?rbmax.y:rbmin.y;
rbminmax.z = (nrdir.z>0.0)?rbmax.z:rbmin.z;
float fa = min(min(rbminmax.x, rbminmax.y), rbminmax.z);
vec3 posonbox = pos + nrdir * fa;
return posonbox - ePos;
}


here is GLSL code: http://dl.dropbox.com/u/11542084/bpcem

and a .blend file: http://dl.dropbox.com/u/11542084/bpcem_playground.blend

August 8, 2011

volume ray casting in BGE

Hey, I got volumetric ray casting to work in Blender Game Engine. The shader is fully done in GLSL, including front&back face calculation in single pass and 2D texture conversion to texture3D, so it should be reeaally easy to implement in every OpenGL supporting engine.

The blend. file is here:
DOWNLOAD

volume texture:
DOWNLOAD

glsl fragment shader: (might crash on ATI/AMD gpu`s. debugging in progress..)
DOWNLOAD

screenshots taken in BGE (click on the thumbnails to see them full-sized) :


different opacity values


simple sample dithering


August 4, 2011

simple and efficient skylight setup

I have been using this lighting setup for years now. So whenever I need to make a prototype or game scene in outdoors this is a lighting template I am using. So I thought someone may find this useful.
Scene uses 3 lights - 1 directional light for sun and 2 hemisphere lights for sky color and reflected ground color. Hemisphere (Ancient Greek: half of a sphere) light is same Half Lambert. It is a perfect solution to imitate sky color and indirect lighting that comes from surfaces lit by the Sun.

float halfLambert(vec3 N, vec3 L)//N, L = Normal and Light vectors
{
retun max(0.0,dot(N,L)*0.5+0.5);
}


which, by the way is developed by Valve for Half-Life.

here are some illustrations:
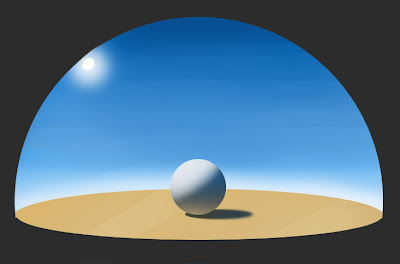
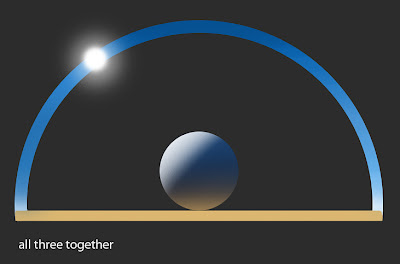
this is an example scene - clear, blue skydome, Sun somewhere in middle between horizon and zenith and sand or dirt as the ground plane.


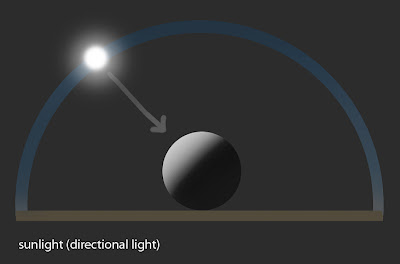
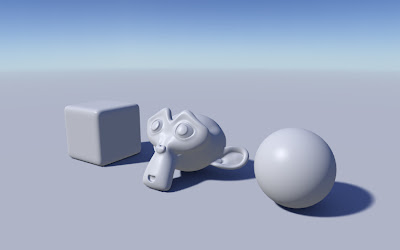
Sun. A directional light, lamp intensity is 1.0 and color is white.


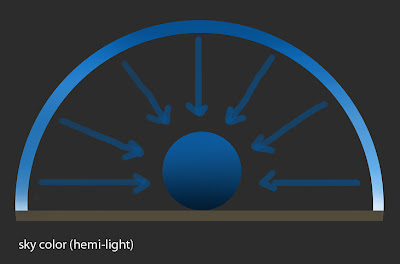
Sky color. The whole skydome emits a lot of light, in our case, blueish. Hemi-light is pointing down .I usually use lamp intensity 0.2 and color (Red 0.0, Green 0.2, Blue 1.0)


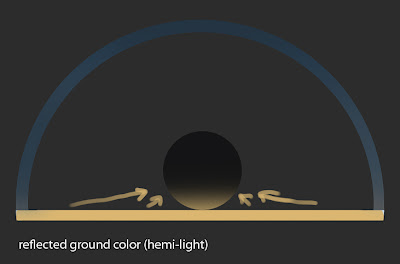
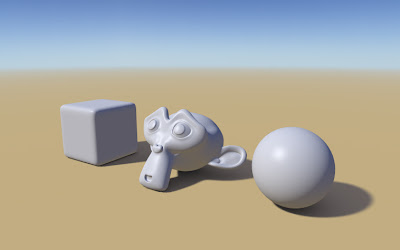
Reflected ground color. It is an indirect light and the intensity and color depends on the surface color. Hemi-light is pointing up. Here we have light orangeish color as a sand or dirt would have.


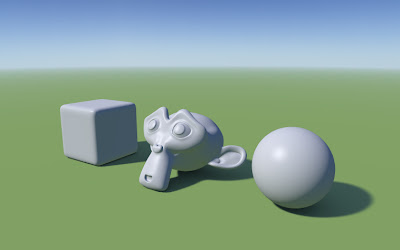
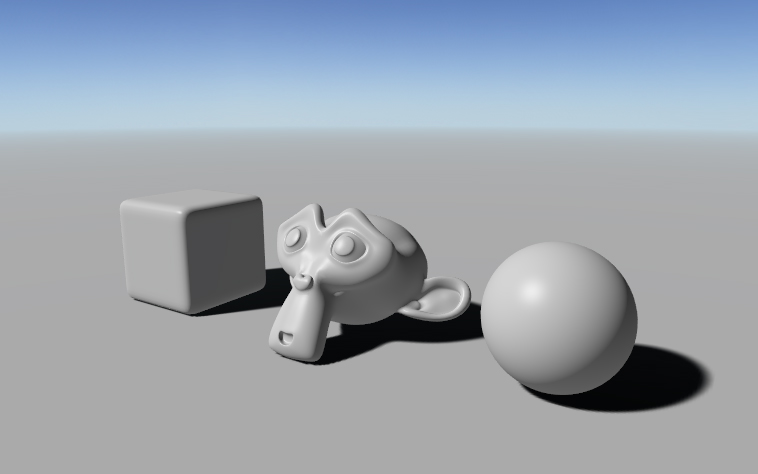
here we have all three lights combined together.


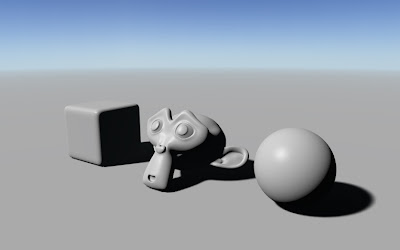
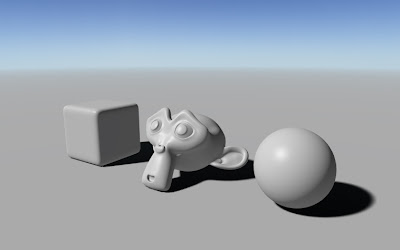
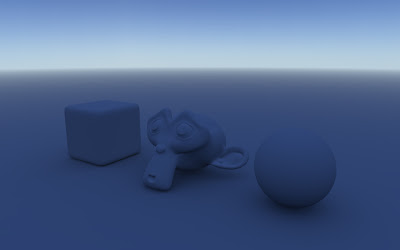
some screenshots from Blender viewport:

sunlight only (shadows on ground are baked in a texture)


sunlight and reflected ground color


sky color only (ambient occlusion on ground is baked in a texture)


full lighting model


dirt


grass


blend file: HERE